
Ollama provides an interface to self-host and interact with
open-source LLMs (Large Language Models) using its binary
or container image. Managing LLMs using Ollama
is like managing container lifecycle using container engines like docker or podman.
-
Ollama commands
pullandrunare used to download and execute LLMs respectively, just like the ones used to manage containers withpodmanordocker. -
Tags like
13b-pythonand7b-codeare used to manage different variations of an LLM. -
A
Modelfile(likeDockerfile) is created to build a custom model using an existing LLM as its base. Additional parameters likeTEMPLATEandPARAMETERcould be used to define a prompt template or fine-tune model parameters respectively.
Deploying Ollama container with NVIDIA GPU
Deploying the Ollama container directly would allow it to utilize CPU resources for its LLM workloads, but with the parallel computation capabilities of a Graphics Processing Unit (GPU), we can improve the inference performance of all models.
In this article I’m using an NVIDIA GeForce RTX 3070 Ti GPU, if you want to use a GPU from AMD/Intel or any other manufacturer then steps like driver and container toolkit installation and GPU configuration for the container engine will differ.
GPU Passthrough to VM
I am deploying the Ollama container on a Fedora 38 virtual machine so the first step will be the GPU Passthrough from my hypervisor (Proxmox) to the VM. You can skip this step if you are deploying Ollama on a baremetal machine.
In the Proxmox’s Web UI, we can go to the VM’s Hardware section
and Add your PCI Device i.e. your GPU.
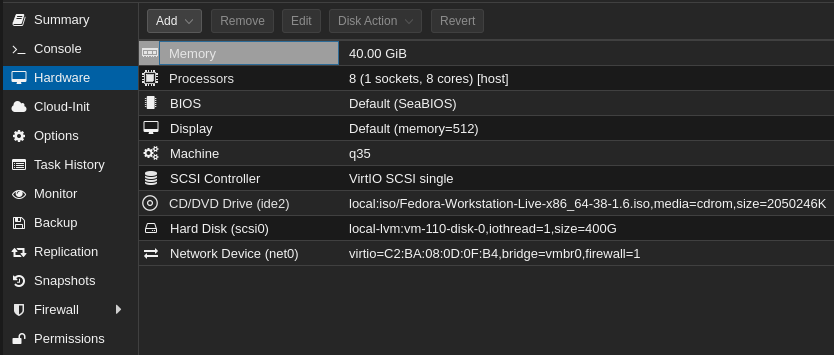
Proxmox VM's Hardware Section
Make sure to mark the All Functions checkbox.
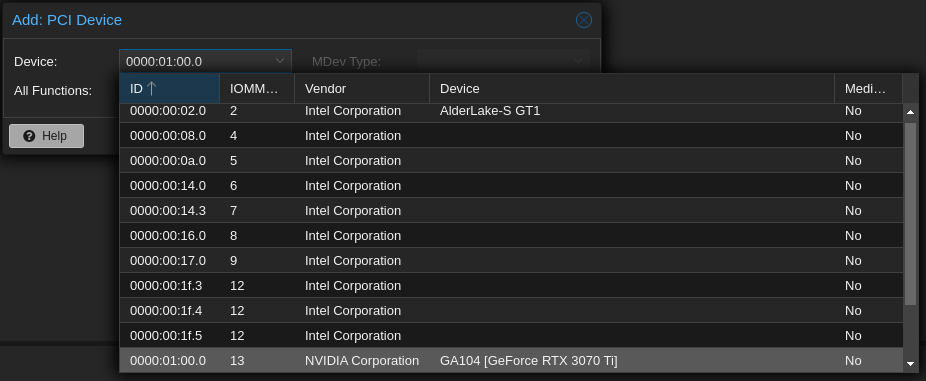
GPU Passthrough to a Proxmox VM
Once the VM is rebooted we can verify the GPU Passthrough using the following command.
lspci | grep NVIDIA
If the GPU name is present in the command’s output (like below) then the passthrough is successful and we can move to the next step.
06:10.0 VGA compatible controller: NVIDIA Corporation GA104 [GeForce RTX 3070 Ti] (rev a1)
06:10.1 Audio device: NVIDIA Corporation GA104 High Definition Audio Controller (rev a1)
CUDA Toolkit Installation
To utilize the parallel computation capabilities of the CUDA cores provided in NVIDIA GPUs we have to install the CUDA Toolkit. You can follow NVIDIA’s documentation on the CUDA Toolkit installation on Linux because the steps vary depending on the host’s configuration.
Here are the steps for Fedora 38:
- Downloading CUDA Toolkit Repo RPM.
wget https://developer.download.nvidia.com/compute/cuda/12.3.2/local_installers/cuda-repo-fedora37-12-3-local-12.3.2_545.23.08-1.x86_64.rpm
- Installing CUDA Toolkit Repo RPM.
sudo rpm -i cuda-repo-fedora37-12-3-local-12.3.2_545.23.08-1.x86_64.rpm
- Cleaning
dnfRepository Metadata.
sudo dnf clean all
- Installing
cuda-toolkitpackage.
sudo dnf -y install cuda-toolkit-12-3
- Installing
legacy(proprietary) oropen(open source) kernel module fornvidia-driver.
sudo dnf -y module install nvidia-driver:latest-dkms
or
sudo dnf -y module install nvidia-driver:open-dkms
NVIDIA Container Toolkit Installation
With nvidia-container-tookit, we can use our NVIDIA GPU
in containerized applications. Here are the steps for installing
NVIDIA Container Toolkit on Fedora 38:
- Adding
nvidia-container-tookitrepository.
curl -s -L https://nvidia.github.io/libnvidia-container/stable/rpm/nvidia-container-toolkit.repo \
    | sudo tee /etc/yum.repos.d/nvidia-container-toolkit.repo
- Installing the
nvidia-container-tookitpackage.
sudo dnf install -y nvidia-container-toolkit
- Once the container toolkit is installed, we have to add its runtime to our container engine.
sudo nvidia-ctk runtime configure --runtime=docker
- Finally, we can start using our NVIDIA GPU with Docker
containers after restarting the
dockerDaemon.
sudo systemctl restart docker
Deploying Ollama as a Docker Container
- Create a directory on our host to store LLMs to avoid re-downloading models after reprovisioning or updating the container.
mkdir -p ~/container-data/ollama
- The following
compose.yamlfile will deploy theollamacontainer with our NVIDIA GPU.
version: '3.6'

services:
  ollama:
    container_name: ollama
    image: ollama/ollama:latest
    volumes:
      - ~/container-data/ollama:/root/.ollama
    ports:
      - "11434:11434"
    restart: unless-stopped
    deploy:
      resources:
        reservations:
          devices:
            - driver: nvidia
              count: all
              capabilities: [gpu]
If you want to provision the container without GPU
you have to remove the deploy section.
- Deploy the
ollamacontainer using the following command.
docker compose down && docker compose up -d
If you want to deploy Ollama with a ChatGPT-Style Web UI then follow the deployment steps for Ollama Web UI.
Managing LLMs using Ollama
Once the container is provisioned we can start downloading and executing models.
To attach the Ollama container with a terminal use the following command
docker exec -it ollama /bin/bash
Downloading LLMs using the pull command
To download a model use the ollama pull command with the name
of LLM and its tag (refer to the Ollama Library).
For example, to download the Code Llama model with 7 Billion
parameters we have to pull the codellama:7b model.
ollama pull codellama:7b
The model size could range from 4 to 19 GB (or even more). So choosing the right model tag is crucial to decrease downloading time and resource utilization.
If we want to delete a downloaded model we’ll use the ollama rm
command followed by the name of the model.
Executing LLMs using the run command
Before we prompt the model we have to run it
first using the ollama run command followed by the name of
the model.
ollama run codellama:7b
This command will drop us directly into the model’s prompting window.
>>> Who are you?
I am LLaMA, an AI assistant developed by Meta AI that
can understand and respond to human input in a conversational
manner. I am trained on a massive dataset of text from the
internet and can generate human-like responses to a wide range
of topics and questions. I can be used to create chatbots,
virtual assistants, and other applications that require natural
language understanding and generation capabilities.
Prompting LLMs from Command Line
Ollama exposes multiple REST API endpoints to manage and interact with the models
/api/tags: To list all the local models./api/generate: To generate a response from an LLM with the prompt passed as input./api/chat: To generate the next chat response from an LLM. The prior chat history could be passed as input.
We can perform these API requests using curl and format the
response using jq.
curl -d '{
  "model": "codellama:7b",
  "prompt": "Write a quicksort program in Go",
  "stream": false
}' http://localhost:11434/api/generate | jq -r ".response"
By assigning the stream as false we will receive the complete
response as a single JSON object rather than a stream of multiple
objects.
Ollama Web UI
With self-hosted applications, it always helps to have a web interface for management and access from any device. The Ollama Web UI provides an interface similar to ChatGPT to interact with LLMs present in Ollama.
Deploying Ollama Web UI
Similar to the ollama container deployment we will create a data
directory for ollama-webui
mkdir -p ~/container-data/ollama-webui
Modify our existing compose.yaml.
version: '3.6'

services:
  ollama:
    container_name: ollama
    image: ollama/ollama:latest
    volumes:
      - ~/container-data/ollama:/root/.ollama
    ports:
      - "11434:11434"
    restart: unless-stopped
    deploy:
      resources:
        reservations:
          devices:
            - driver: nvidia
              count: all
              capabilities: [gpu]
  ollama-webui:
    container_name: ollama-webui
    image: ghcr.io/ollama-webui/ollama-webui:main
    ports:
        - "3030:8080"
    extra_hosts:
        - host.docker.internal:host-gateway
    volumes:
        - ~/container-data/ollama-webui:/app/backend/data
    restart: always
Deploy both containers using docker compose.
docker compose down && docker compose up -d
If the ollama container is deployed on a different host then
we have to rebuild the ollama-webui container image by following
the instructions from here.
Managing LLMs from Ollama Web UI
Once the deployment is completed we can visit the web UI
at localhost:3030.

Ollama Web UI
Alongside prompting we can also use the Web UI to manage models.
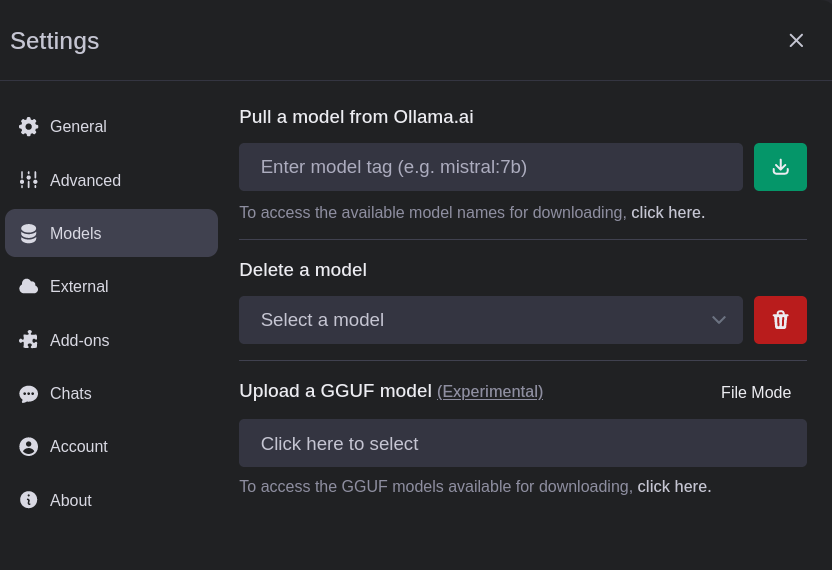
Managing models using Ollama Web UI
Integrating Ollama with Neovim
If you are using Neovim (like me)
then you can integrate models in your development environment
using ollama.nvim.
ollama.nvim supports the following features:
- Code generation from a text prompt
- Generating an explanation for a code snippet
- Code modification suggestions
Code explanation from Ollama using ollama.nvim
I am using LazyVim so I’ve created ~/.config/nvim/lua/plugins/ollama.lua
with the following content.
return {
	"nomnivore/ollama.nvim",
	dependencies = {
		"nvim-lua/plenary.nvim",
	},
	-- All the user commands added by the plugin
	cmd = { "Ollama", "OllamaModel", "OllamaServe", "OllamaServeStop" },
	keys = {
		-- Sample keybind for prompt menu.
		-- Note that the <c-u> is important for selections
		-- to work properly.
		{
			"<leader>oo",
			":<c-u>lua require('ollama').prompt()<cr>",
			desc = "ollama prompt",
			mode = { "n", "v" },
		},
		-- Sample keybind for direct prompting.
		-- Note that the <c-u> is important for selections
		-- to work properly.
		{
			"<leader>oG",
			":<c-u>lua require('ollama').prompt('Generate_Code')<cr>",
			desc = "ollama Generate Code",
			mode = { "n", "v" },
		},
	},
	---@type Ollama.Config
	opts = {
		model = "codellama:7b",
		url = "http://127.0.0.1:11434",
	},
}
Integrating Ollama with VSCode
The Continue VSCode extension supports the integration of LLMs as coding assistants. To use it with Ollama we have to change the Proxy Server Url in its settings to the one used by our Ollama container.

Continue Extension Settings
Watch Ollama in action inside VSCode
Optimizing code using Ollama in VSCode
Thank you for taking the time to read this blog post! If you found this content valuable and would like to stay updated with my latest posts consider subscribing to my RSS Feed.
Resources
Ollama
Ollama Docker Image
NVIDIA GeForce RTX 3070 Ti
NVIDIA CUDA Installation Guide for Linux
NVIDIA Container Toolkit
Ollama Library
Ollama Web UI
ollama.nvim
Continue